


What integration can do
Export your customers from your loyalty system to SmartEmailling to send automated emails and campaigns. Import email, account status, PIN, registration flag, last account change and next expiration. All of this data can be used in emails and automated scenarios. You can also reward the customer for signing up for your newsletter via the SmartEmailing form.
In SmartEmailing Automation, you can easily build a scenario tailored to your program. The automation will allow you to send emails, SMS messages or otherwise work with a lead, for example through regular campaigns. But you don't have to stay with just regular communication, you can also work with webhooks, FB Audience, Sklik retargeting, Viber messages, etc. There is real-time data in custom fields at the contact level thanks to this integration. You can easily add values to the body of an email or SMS and also work with them in automation by placing conditions.
SmartEmailing also has a number of ready-made scenarios. To get started, you can easily customize them for your needs. There is also a team of SmartEmailing specialists who can help you with onboarding or building custom scenarios.
All you need is a nice template and you can send out emails when a customer changes their account, a customer PIN when they place their first order, or notifications of expiring customer points for the period you want.
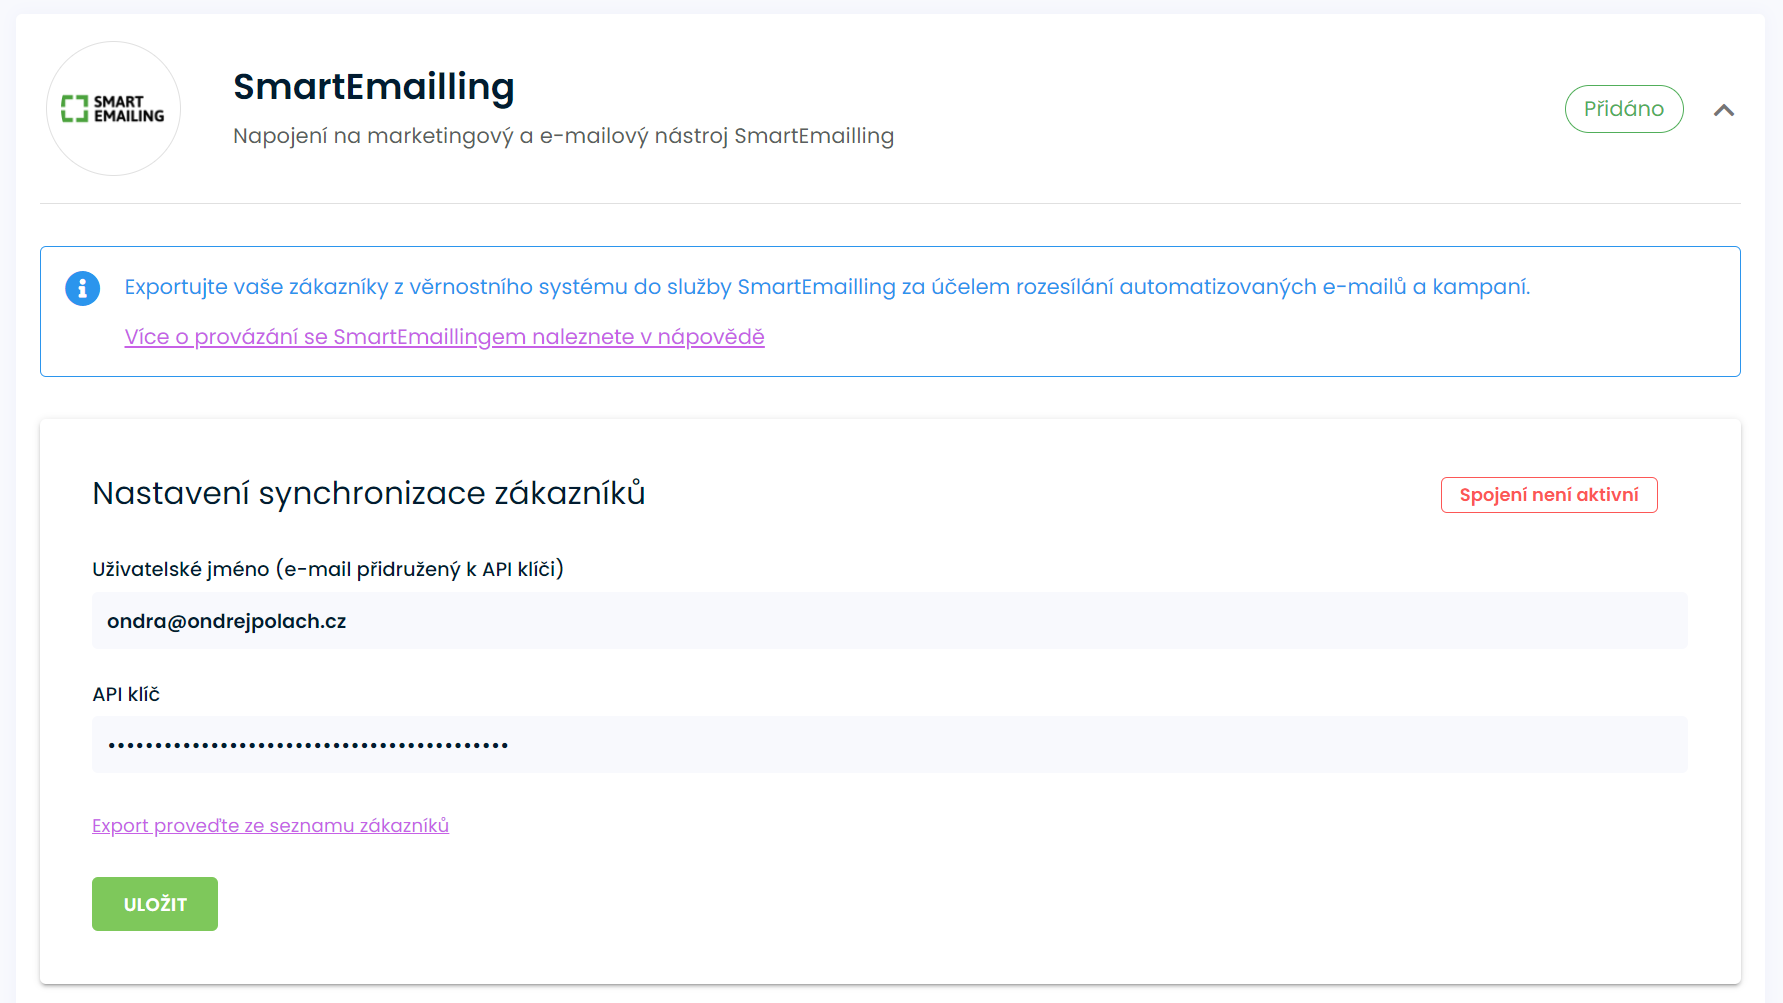
Installation
In the settings, go to the Integration section. If you haven't added the SmartEmailling Integration feature yet, add it. Now you need to fill in your username and API key. Both values can be found in your SmartEmailling account under My Account - API Keys. Use the email displayed above the Create API Key button as your username. If you do not have an API key in your account, create one by pressing this button.

You now have both pieces of information available and can enter them into the integration settings in the Ellity console. Once you have filled in, press the Save button.
If the activation goes well, a custom field is created for the values listed above (account, etc.). These fields are prefixed with ellity_ for new integrations and mehub_ for older integrations.
Automation
In SmartEmailing automation, you can use several scenarios to communicate with your customers.
You can respond to the following events:
- customer account change(ellity-credit-changed): the number of points and the reason for the change are sent. You can condition the sending of specific emails based on the reason.
- points expiration(ellity-credit-expires): sent a set number of days before expiration, if set in Ellity.
- PIN change(ellity-pin-changed)

A friendly thank you on the anniversary of the account
With the ellity-credit-changed event, you can send personalized emails to your customers based on the reason for a point account change. For example, if a customer lands 10 anniversary points on their account, they'll be delighted to receive an email informing them of this. You can respond to the following changes:
- registration - points for registration
- order - points for purchase
- review - points for review
- nameday - holiday
- birthday - birthday
- anniversary
- for more contact our support
Reward for subscribing to the newsletter
If you want to reward a customer for joining your subscription list via the contact form on your e-shop, you can. You can also remove points if they unsubscribe from the list. For both actions, you need to create a separate webhook in SmartEmailing automation by following the steps below.
- Create a new automation or use an existing one
- Add a Change action to the list - select the list and set the status to Confirmed to add points (to remove, set to Unsubscribed or Removed)
- For Change in list, add and append action Webhook, which you set as follows
- URL Targets set to the URL from the Webhook settings in Ellity
Set HTTP method to POST
Add the X-Secret-Key header and insert the API key value from the Webhook settings in Ellity
Set the request body as follows
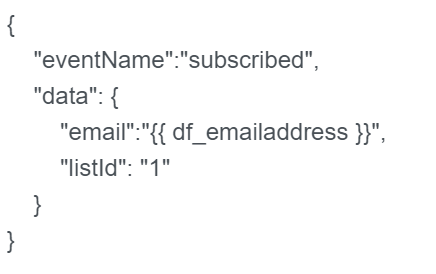
- set eventName to subscribed (to add points), unsubscribed (to remove points)
- email is the customer's address
- listId is the numeric ID of the list you selected in the previous step
Save and start the automation. Repeat the steps and use unsubscribe and unsubscribed to remove points when you log out. The automation will look similar to the following image.

To subscribe to multiple lists, you must create a separate webhook for each list by following the steps above.
Finally, in Ellity, set the points to be credited when you log in to the subscription list and save.

Pre-expiry notification settings
Once activated, you can set the integration to send a notification when points expire in advance of the number of days you set. To send the settings, select Notify SmarEmailling in the first field and enter the number of days before expiration you want the notification to be sent in the second field. If you do not want to send notifications, set to Do not send. Then press the Save button.

Notifications are sent once a day at night if the customer runs out of more than 0 credits in the selected number of days. The ellity-credit-expires event is fired with the value of the expired points and the date when the expiration occurs.
Export of customers
Customer data is sent to SmartEmailing automatically when customer data is created or changed. To export all customers at once, go to the Customer List and press the export button on the top right. This will export all current customers in the system. Either a new record is created in SmartEmailing or an existing record is updated. This should be done after the integration is first activated.

Setting up outgoing emails from the system
If you will be using SmartEmailling to send these emails, you will need to disable the system sending. This is done in the basic settings of the loyalty system.
What should I do if the activation ends in an error?
- Check email and API key for accuracy
